


coolhand
-
Posts
39 -
Joined
-
Last visited
-
Days Won
1
Content Type
Profiles
Forums
Gallery
Paramotor Shop
Downloads
Blogs
Events
Posts posted by coolhand
-
-
Hi Casey, Did you connect the starter directly to the battery (of course with a switch in between) so your battery is not being charged during the flight?
Tried finishing up on the installation of the motor, however not yet finished. Will continue this afternoon and hopefully the testrun this evening will show no abnormalities anymore
")
-
Thnx for all the great comments sofar.
Last night compared the values I got with an almost brand new Thor 200 and I got matching results, so I guess the aircraft side of the wiring is ok. The regulator itself is toast, on a side note: do not mount your regulator on the cage frame right below the reserve (I have a reserve behind my head). For now the regulator only became very hot, when the flight would have lasted longer it could very well have erupted in flames (which is not particularly nice, behind your head below your reserve....).
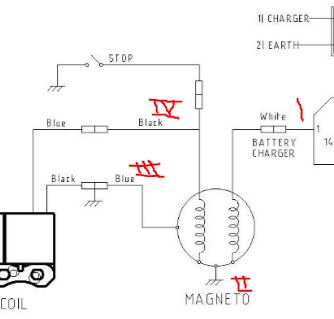
I attached a document stating the factory values of the magneto and coil.
Punt Factory Actual New Thor Coil A -> B 3,5 - 7 KΩ 8,8 KΩ 9,5 KΩ Magneto C -> D 0,3 - 1 Ω 1 Ω 1 Ω D -> E 200 - 500 Ω 282 Ω 250 Ω Just to make sure I will be replacing the sparkplug, hopefully tonight I will manage to get some spare time to mount the motor back to the frame and do some testruns.
After talking it through with some local friends I think the max. power output of the accessory side of the magneto was too much ( max. 50 W) for the fitted regulator (max 6W) combined with the strobes which draw 4 W, causing the regulator to overheat and eventually drawing too much power from the magneto which resulted in substantial power loss due bad ignition (I flew at full throttle barely maintaining altitude), hence the wet and black sparkplug.
-
Removed the motor from the frame this afternoon (20 min. job
)
After measuring resistance of the blue/black/white wires coming from the coil I measure the following:
Between:
- 1 and 2 ==> 1,2 ohm
- 1 and 3 ==> 1,2 ohm
- 4 and 3 ==> Infinite (or something like 45 ohm when turning the flywheel)
- 4 and 2 ==> infinite (or something like 45 ohm when turning the flywheel)
In my opinion the measurements between 1 and 2 and 4 and 2 should both be somewhere in the same region (as should the measurement between 1 and 3 and 4 and 3 be).....
Am I correct in my thinking or is it correct that these values are not be the same??
The wireloom between the cutout (stop) switch and the black wire coming from the coil (4) measures approx. 1 ohm, so this part is definitely correct.
-
Hi, did anyone by any chance have to replace their Magneto (Thor 200 evo)?
After the last flight this weekend a burning smell became apparent. The cool itself does not smell weird. When I turn the propeller the smell becomes stronger as the fan drives air past the engine. Besides this the engine did not start as easy as normally (Sparks plug alsof black and wet).
Now looking for any info on replacing the Magneto + wiring. Does the engine have to be remover from the frame or can IT be accessed via the harnessside?
-
True about static load, however bikes also stick out so the carrier is well within limits. I strap my paramotor down using straps which attach at shoulder height to the cage and run down forward and backward at an angle. This diminishes the torque load on the frame and the cage stand itself.
-
I use the TZ in combination with a HSCom headset and Sena Bluetooth set. Love the fit of the helmet (although next time I would really consider an Ozone model), cheaper (in Holland) and I like the form better. For now the TZ is sufficient.
-
I modified a Twinnyload Bike carrier (dutch, always bikes
) to carry my PAP. Works as a charm. PAP uses Propcovers which can be attached to the cage, so no windmilling. Twinnyload is rated at 75 Kg, so no problem there.
-
 1
1
-
-
On 5-2-2017 at 20:51, simonmarshall said:
Here's my deployment of a reserve mounted behind my head on at PAP1400 frame.
It gets in your way looking-up to check your wing on take-off, but I think it's the best place for deployment, and still keep it mounted there.
Simon
What a scary looking video. And brave man you are for taking to the skies again!!
Below a video I made of me deploying my head mounted reserve during a training session (which I most certainly recommend to every student pilot (as myself)).
-
22 minutes ago, PatPux said:
Just done this set up, similar to some above. Full details with each photo on Flickr

Nice howto! Do you also connect a 2-way radio to your setup?
-
Thnx for the advise sofar. I currently have the Yaesu hardwired to my headset (HScom). Can you maybe elaborate what will happen when I route the radio audio via the Sena system and I will simultaneously get a intercom call? Will it mute the 2-way radio signal? For now the radio signal should have the highest priority.
-
Yaesu FT-270 (Yaesu screw-in type plug).
-
On 6-2-2017 at 08:08, allrightscud said:
My set up is home made after seeing the horrendous prices of custom off the shelf set ups.
I used a set of pelter optime II ear defenders. These can be used over the head as is or fitted to existing helmet mounted ear defender mounts.
It gives me great blue tooth for phone calls and music in flight as well as 2 way radio comunication with the Motorola or a duel band Baofeng.
It was so easy to make up, the ear defenders cushions come off allowing you access to dermal a cable size hole to the case of the defenders. Each ear cup has 2 speakers in it 1 for the blue tooth set up and 1 for the radio set up. The radio cable can have the either adaptor fitted for 2 way or duel band depending on who I’m flying with. The push to talk and the blue tooth receiver is mounted on my helmet with Velcro. The holes are sealed with sugru but any glue or sealant would do.
http://www.ebay.co.uk/itm/322229454702?_trksid=p2060353.m2749.l2649&ssPageName=STRK%3AMEBIDX%3AIT
http://www.ebay.co.uk/itm/252060061018?_trksid=p2060353.m2749.l2649&ssPageName=STRK%3AMEBIDX%3AIT
http://www.ebay.co.uk/itm/131522858193?_trksid=p2060353.m2749.l2649&ssPageName=STRK%3AMEBIDX%3AIT
You exactly described the same situation I am trying to work out. Do you maybe have any schematics, photos or pinouts?
I wanted to use the Sena 20 and than connect my Yaesu radio to the unit (possibly with a dedicated mic. attached to the boom mic. However, I could not figure out how to connect the audio out signal (from the Yaesu) to the Sena unit.
-
Currently in the same process.
") Good question.
Good question.
-
1
-


Thor 200 Magneto + wiring
in Paramotors.
Posted
Hi Casey, That sounds great! Can you maybe share the specs of the lipo('s) you use and maybe a picture, quite interested.
I fired my unit back up yesterday and she started with one pull (just replaced the sparkplug) and ran fine at Idle. Today I will do some high power runs to see if the transit from idle to takeoff power and back is as it should be. I just adjusted the Idle rpm from barely 1400 to 1700(ish).